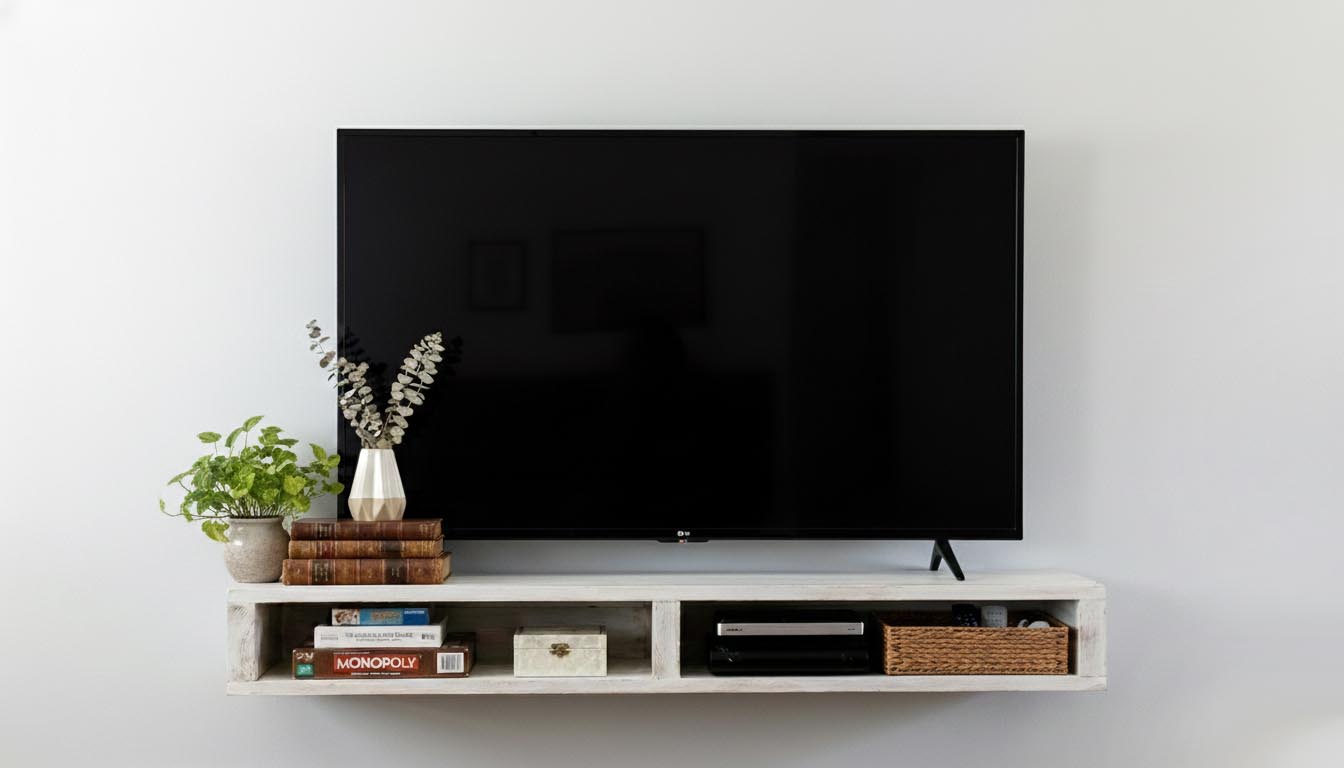
How to Construct a Floating TV Shelf for Optimal Storage
Greetings, DIY enthusiasts! Today, I’m thrilled to present an outstanding project that enhances storage capabilities, improves organization, and liberates valuable floor space in your living areas.
My son recently transitioned into his inaugural college apartment, where, as is typical for such beginner living quarters, every square inch counts. He expressed a desire to secure his television directly onto the wall while incorporating dedicated storage for his video games and electronic devices. To address these dual needs effectively, I designed a clever floating TV shelf stand that maximizes storage efficiency and proves ideal for compact spaces, whether positioned in the bedroom, living room, family area, or any other suitable location.

Numerous pre-made TV stand options were available for purchase, but he specifically favored a sleek floating aesthetic that complemented the contemporary atmosphere of his apartment. We brainstormed various design concepts collaboratively, yet settled on crafting this straightforward DIY solution as a joint effort.
Following the assembly and surface treatment of the floating shelf in my workshop, we carefully transported it to his college town for final setup. The process proved remarkably simple, though we completed the construction by drilling precise holes for cable routing only after arriving at the apartment, allowing us to account for the actual dimensions of the plugs and cables. With the shelf securely mounted, he threaded the television and component wires through the designated openings and connected everything to the wall outlet. Finally, we stocked the shelf with his collection of games and gaming peripherals.
I’m delighted to provide these uncomplicated DIY blueprints for constructing your own floating TV shelf stand. The detailed plans guide you through building a unit measuring 48 inches in width, 5 inches in height, and 12 inches in depth.
Before starting your project, take accurate measurements of your TV’s base footprint. You have the flexibility to extend the width of your floating TV stand to better accommodate larger screens. However, it’s advisable not to exceed the recommended depth by more than one or two inches. Extending the shelf beyond 12 inches in depth risks sagging over time or compromising the structural integrity, particularly along the front edge.

This particular shelf design is exceptionally user-friendly to assemble and requires no specialized or exotic tools. You can complete the build in just a few hours and have it mounted on the wall in approximately five minutes, making it a quick weekend warrior project.
Are you prepared to dive into the step-by-step process for creating your personalized floating TV shelf? Let’s gather the necessary materials and tools first, which I’ve outlined comprehensively below for your ease of reference.
Floating TV Shelf Building Materials
- Miter saw for precise angled and straight cuts
- Drill for creating holes and driving screws
- Circular saw (or table saw as an alternative) for ripping and crosscutting lumber
- Tape measure for accurate dimensioning
- 1 ¼-inch hole saw for cable management openings
- One 2x4x8-foot board or one 2x6x8-foot board for the frame components
- 2-foot by 4-foot sheet of ¾-inch plywood for the shelf surfaces
- Edge banding to give plywood a finished, professional appearance
- 4 ¼-inch structural screws for robust wall attachment
- 1 ¼-inch wood screws for assembling the frame
- Wood glue to reinforce joints and connections
- Your preferred finish, such as paint or stain, to match your decor
- Level to ensure perfect horizontal alignment during installation
Floating TV Shelf Cut List
- One piece measuring 1 ½ inches by 3 ½ inches by 48 inches (serves as the back frame of the TV shelf)
- Three pieces each 1 ½ inches by 3 ½ inches by 10 ½ inches (act as the internal supports for the shelf)
- Two pieces each ¾ inch by 12 inches by 48 inches (form the top and bottom panels of the shelf)

Detailed Instructions for Building the Floating TV Shelf
These instructions will lead you through creating a structurally robust TV display shelf that supports weight securely without sagging.
Important Notes on Measurements and Customization
The height of your shelf’s interior opening can be adjusted based on your preferences and storage needs. Opting for a 2×4-inch board results in a 3 ½-inch tall compartment. Alternatively, selecting a 2×6-inch board yields a more generous 5 ½-inch height. If you possess a table saw, you can customize the board width by ripping it to your exact specifications—for instance, in this project, I trimmed a 2×6 down to 4 inches wide to form the frame perfectly.
Once you’ve finalized the overall width for your setup, proceed by cutting the primary back piece to 48 inches in length. Follow up by crosscutting your three support pieces to precisely 10 ½ inches each. Double-check all measurements twice to avoid errors that could affect fit and stability.
Professional Installation Guidelines
For safety and longevity, it’s imperative to anchor your floating shelf directly into wall studs. This tutorial assumes installation on a standard wood-framed wall covered with drywall. Should your wall consist of different materials, such as concrete or masonry, employ appropriately heavy-duty anchors to ensure a firm hold capable of bearing the load.
Begin by identifying the ideal mounting position for your shelf. Employ reliable techniques to locate wall studs without relying on electronic finders, such as tapping methods or small test holes. Position a level across the shelf’s length to confirm it remains perfectly even. Identify a minimum of two studs—ideally three—positioned behind the shelf’s back panel. Secure the assembly using at least 4-inch long structural screws driven through the shelf’s rear directly into the studs. With these steps completed, your installation is finished, providing a secure and stylish addition to your space.
This innovative shelf design not only optimizes the area beneath it for additional storage solutions but also maintains a clean, minimalist, and modern aesthetic throughout your home environment.